- June 23, 2018
- Posted by: Alec McDaniel
- Categories: Hands-on Labs, How-To
Use PowerApps to create your own security camera dashboard
In the first article of this series we’ll show you how easy it is to create visually appealing dashboards in PowerApps that you can use on a desktop or a mobile device.
We will be calling JPG streams from a series of IP cameras to display thumbnails and render a full-size image for monitoring one incoming JPG stream at a time. At first, we will be using a simple polling mechanism to retrieve JPG updates and hard coding the camera URLs. In the next series, we will be adding Azure Table Storage to make the dashboard data-driven. After this, we will use Azure Media Services Motion Detector to detect changes in the incoming JPGs and alert subscribed users of motion detection notifications.
Prerequisites
In order to create an app in PowerApps, you will need the following:
– An active Office365 Account
– An active Microsoft Azure Subscription
1. Create PowerApps app
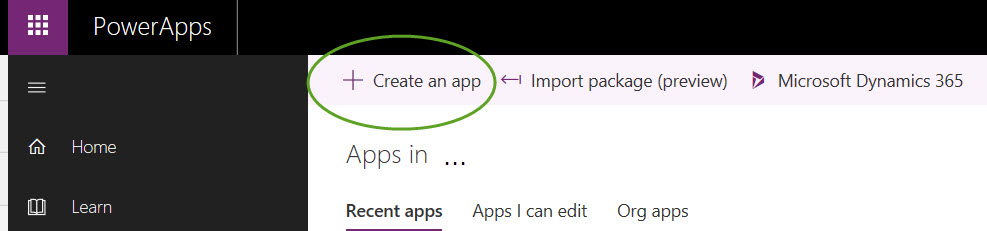
Go to https://web.powerapps.com and click Create an app.
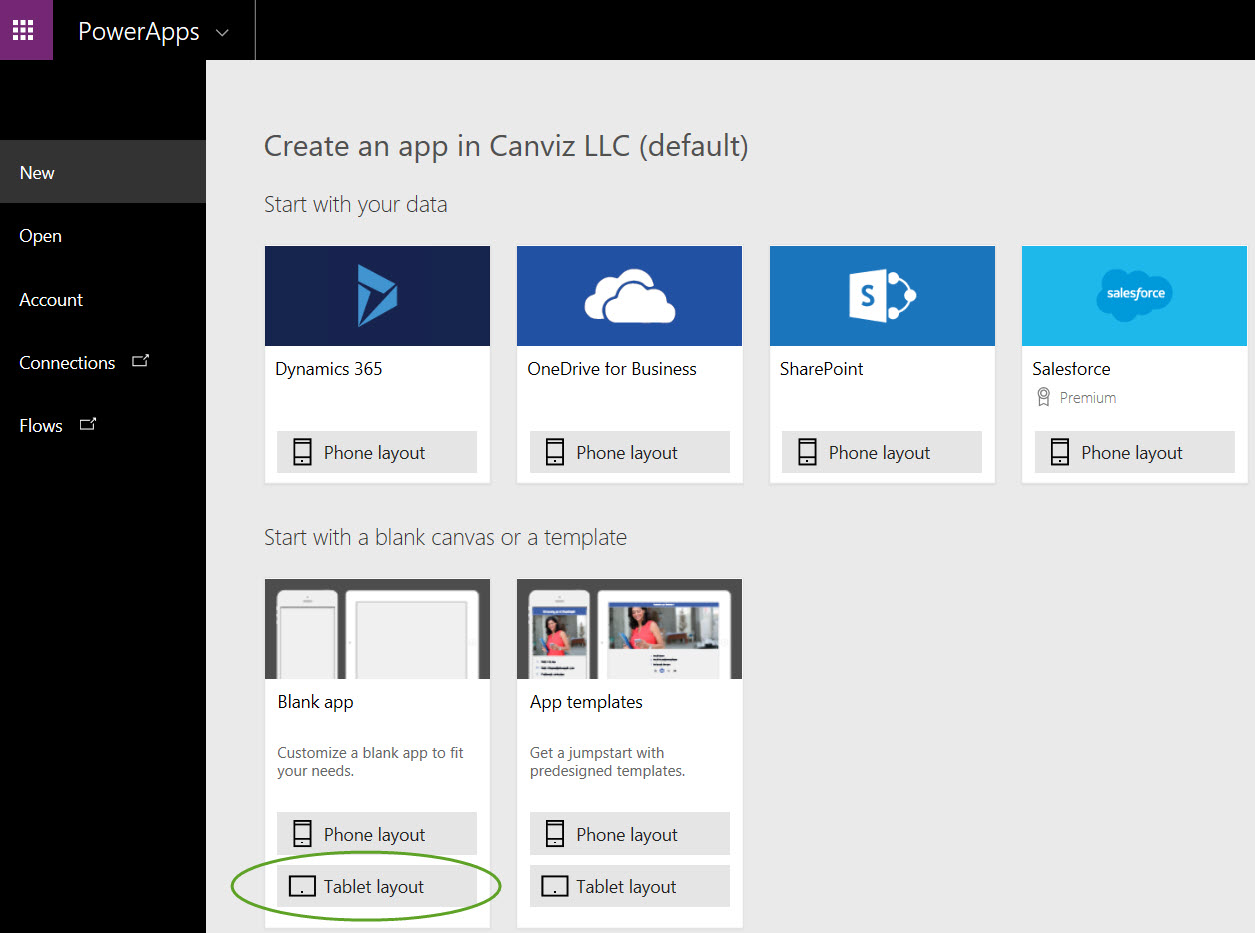
Then, click Tablet layout below Blank app.
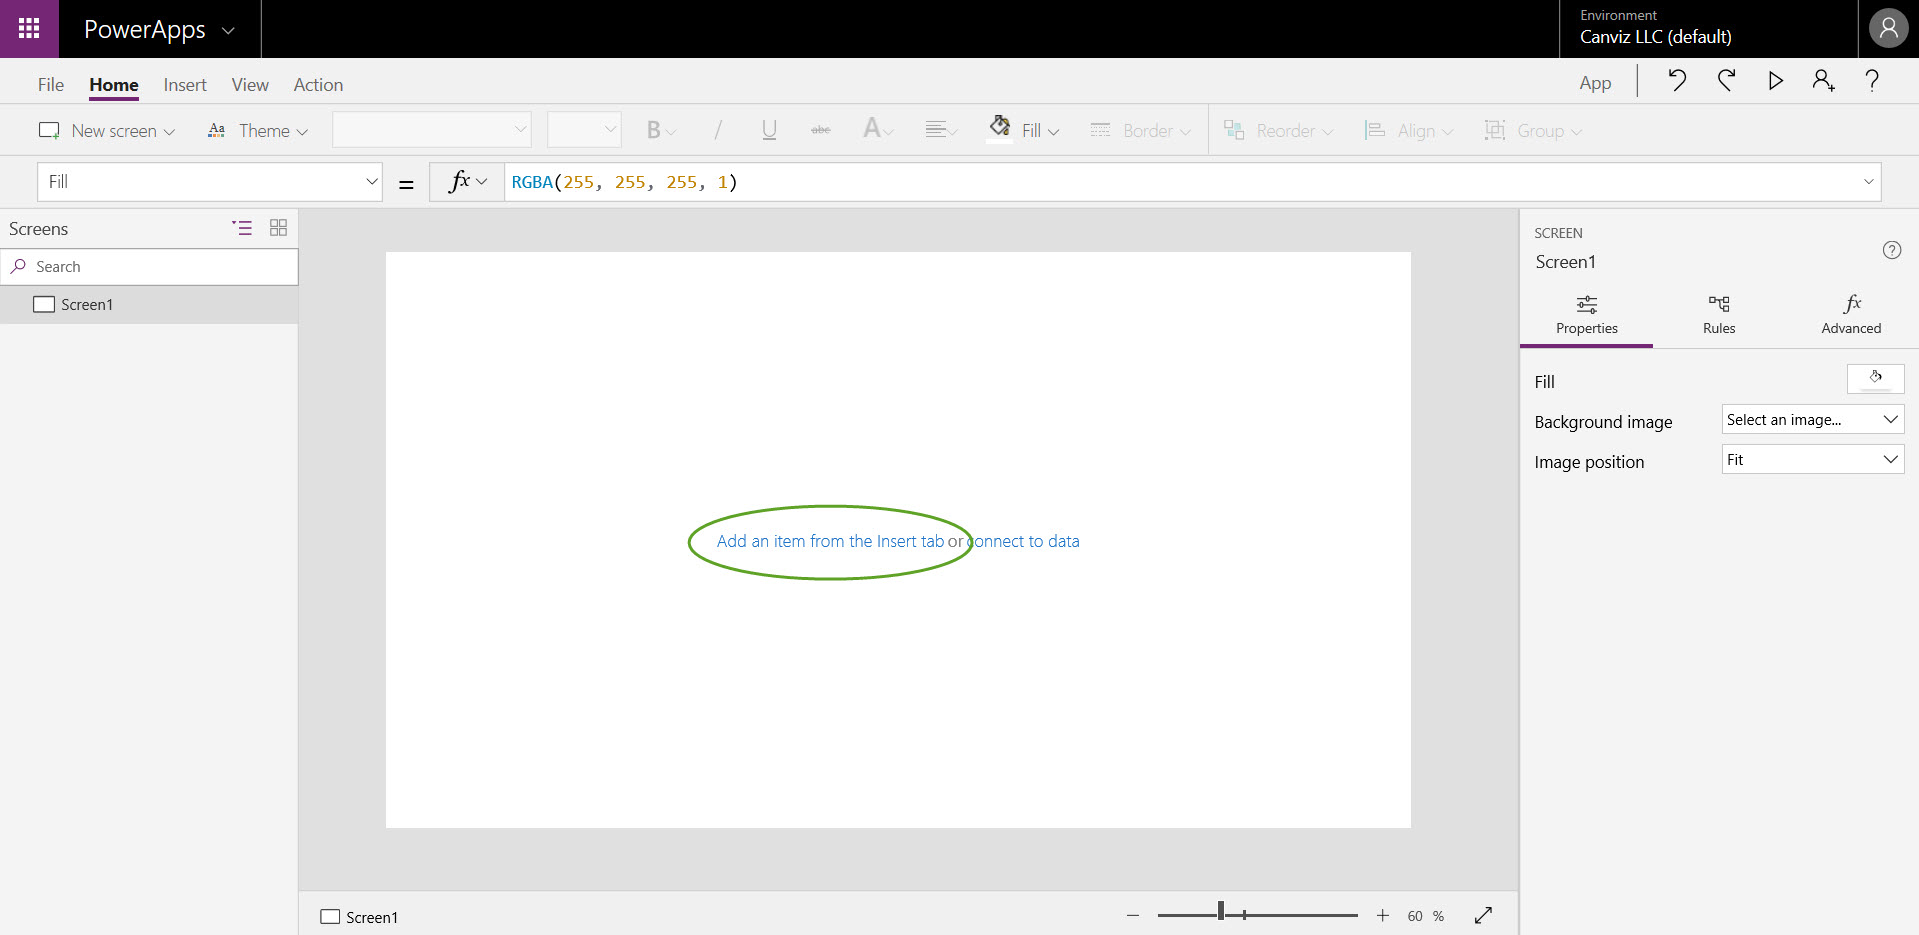
Then a blank canvas will appear. Click on the link in the center of the canvas “Add an item from the Insert tab“.
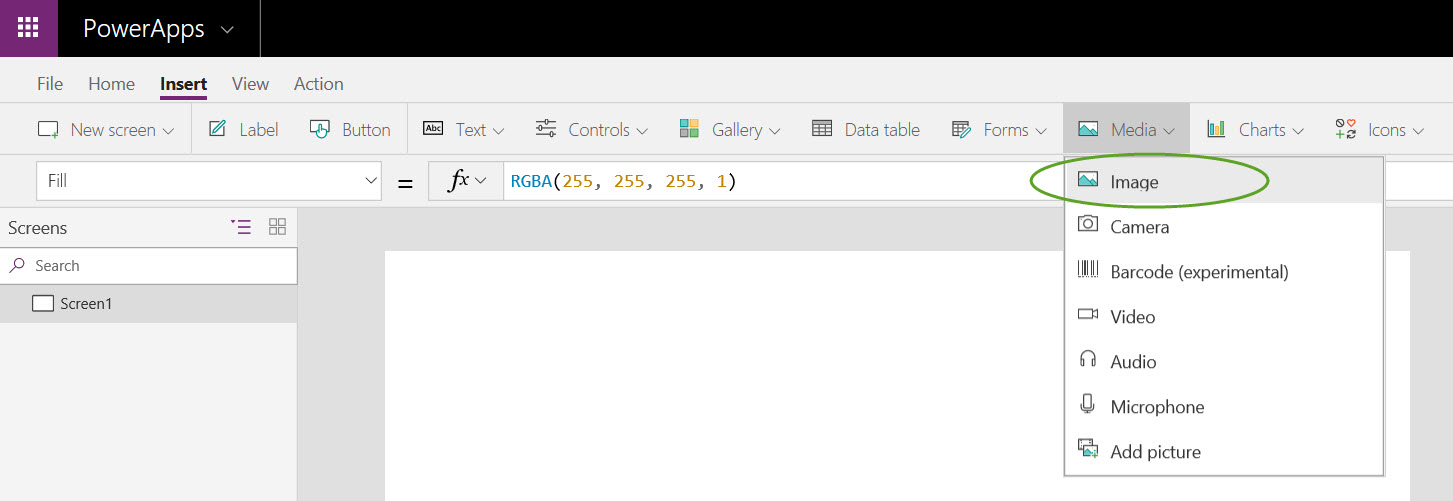
2. Add Image Placeholder
Then the Insert menu bar appears. Please select Image from the Media sub menu.
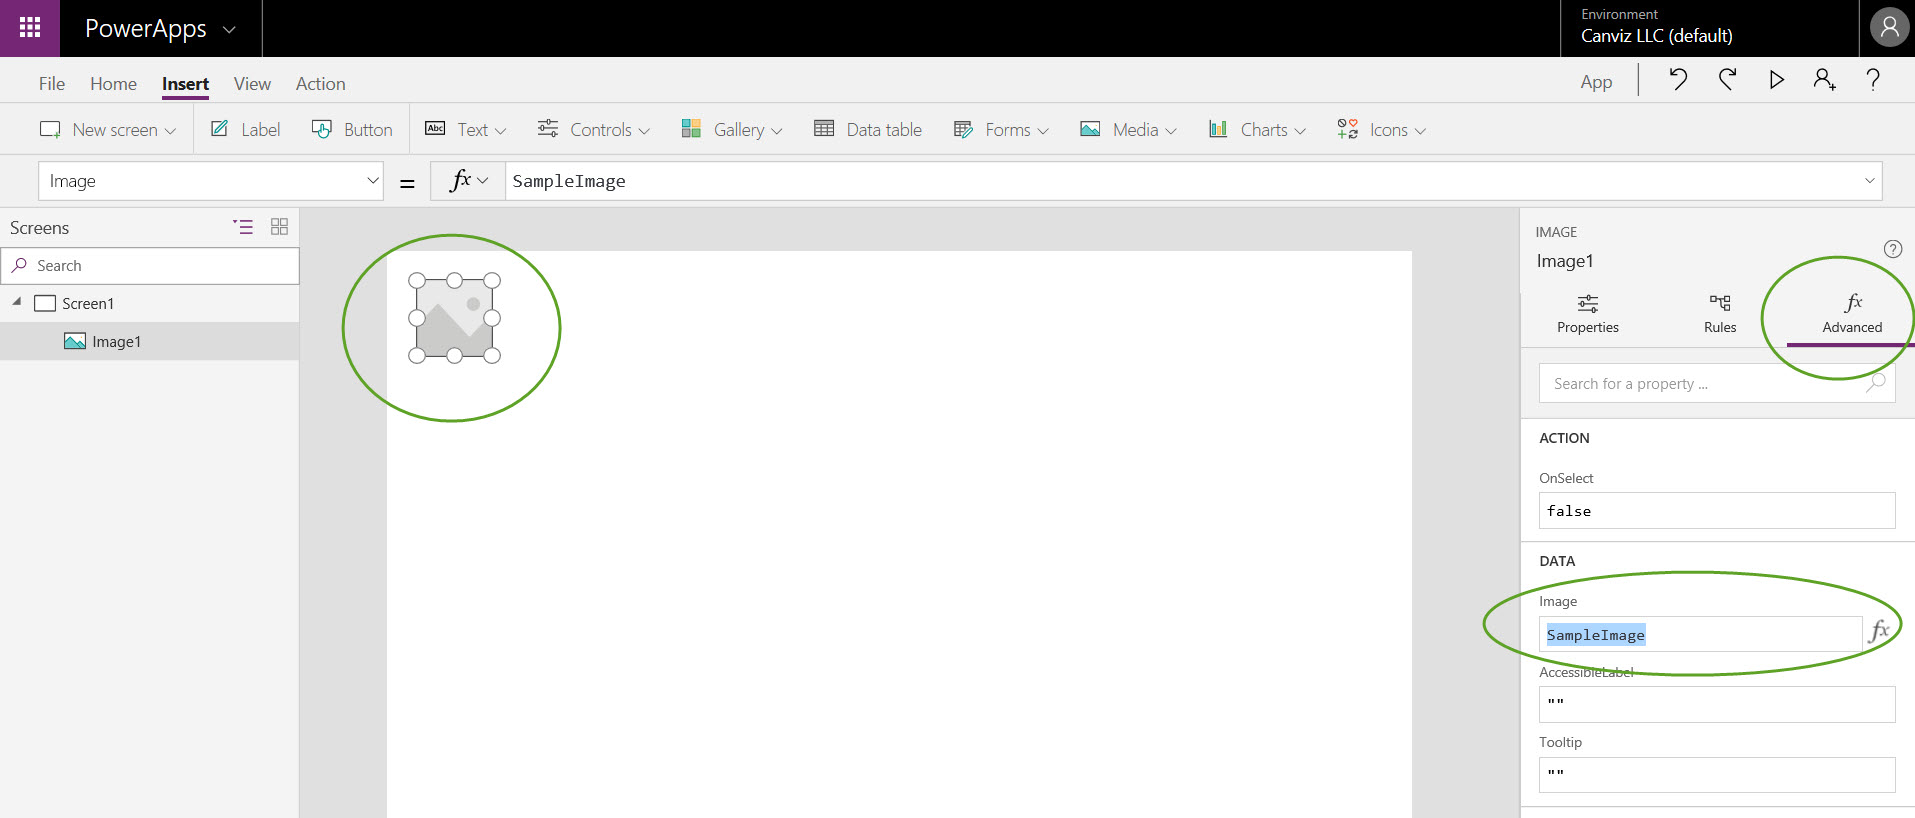
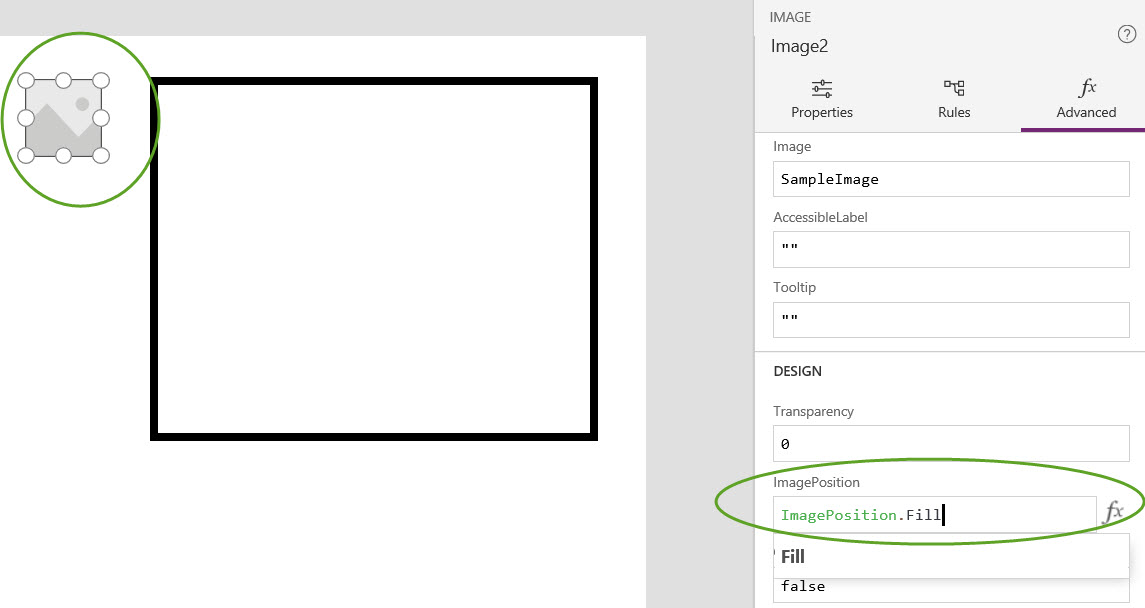
An empty image placeholder will appear on the canvas. Then, select the Advanced tab from the properties panel on the right and change the Image attribute value from “SampleImage” to “ImageUrl”. This will implicitly create a variable with the name ImageUrl. We can use that variable later on to point it to the camera url.
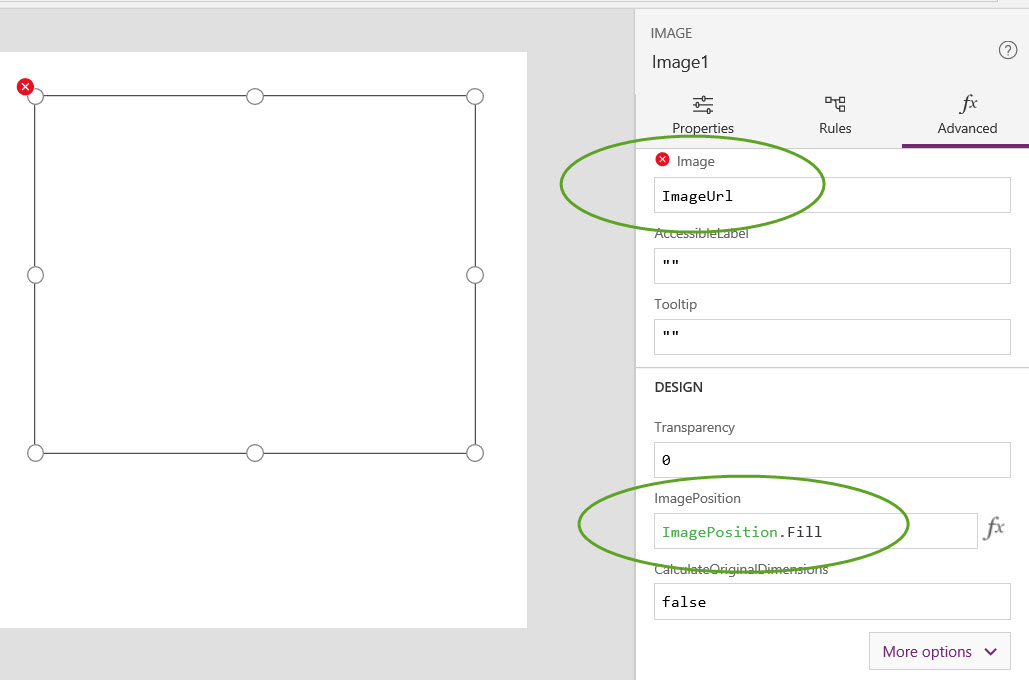
Now let’s move the image placeholder to the right and resize it. And change the ImagePosition attribute from ImagePosition.Fit to ImagePosition.Fill. This will make the image grow within the boundaries of the placeholder in a way so that every pixel in the placeholder is used.
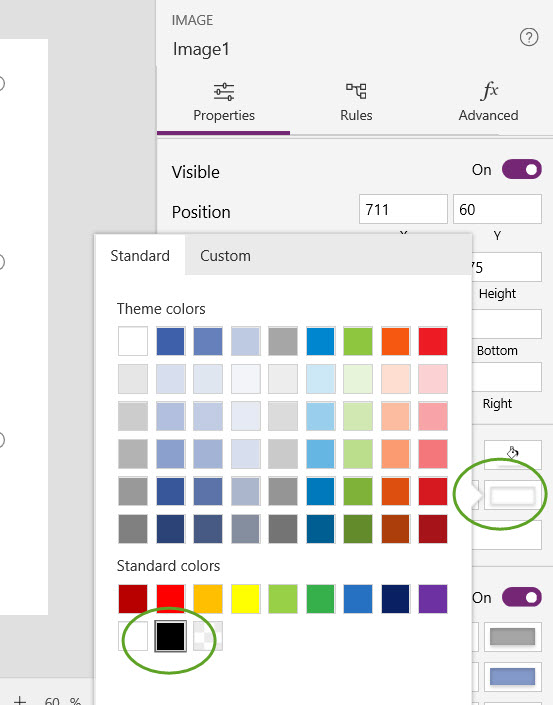
Let’s give the image placeholder a nice thick border by clicking on the Properties tab in the panel on the right, and clicking on the white square with the thin grey rectangle inside next to Border property.
Let’s give it a thickness of 11.
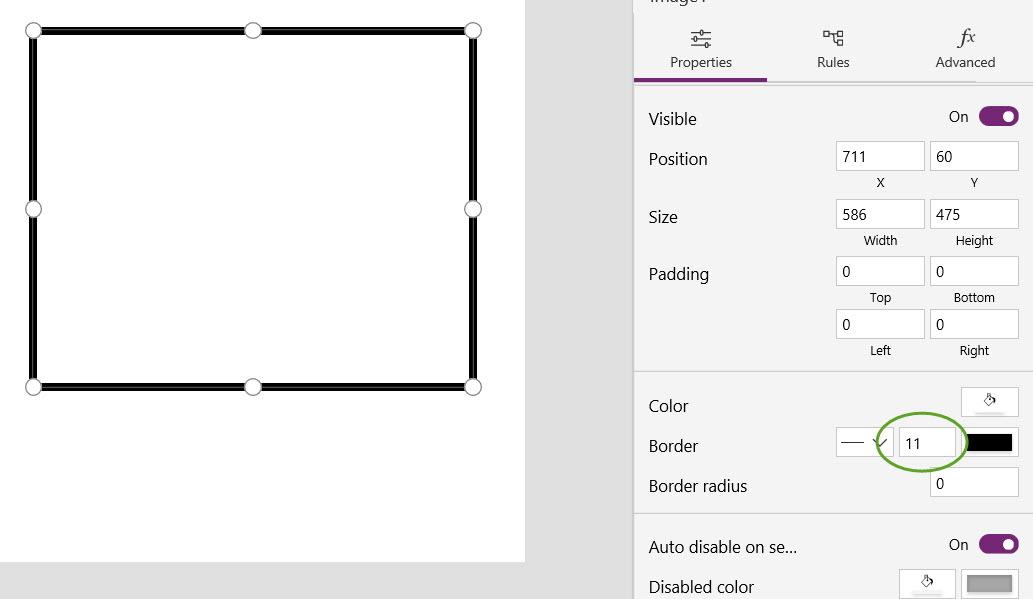
This will not only give the security cam footage a nice border to make it more visually appealing, but we can also easily keep seeing the placeholder on our canvas without having to select it from the control list in the Screens panel on the left 😉
3. Add Timer
Now, let’s add a Timer to the canvas by selecting Timer from the Insert \ Controls sub menu.
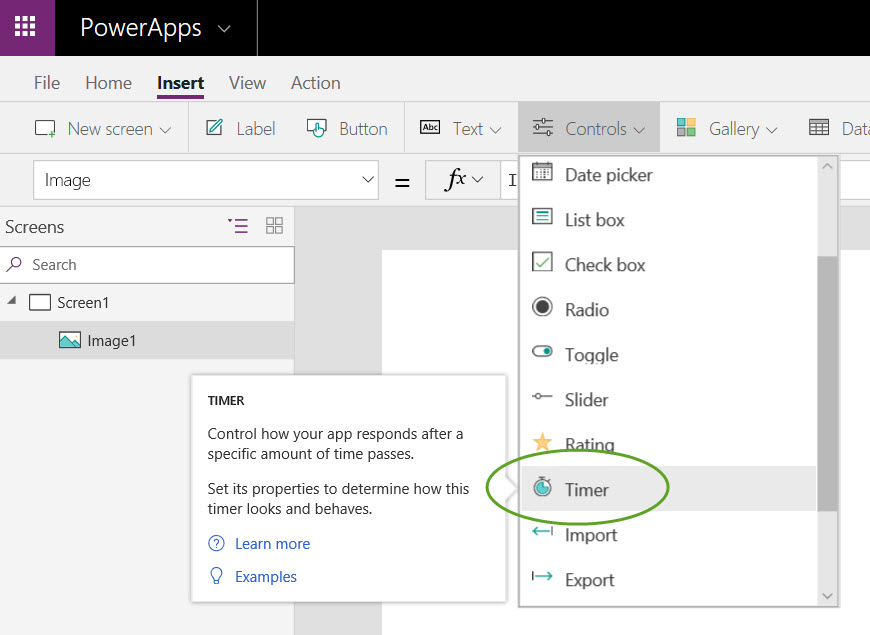
This will place a Timer control on the canvas. A timer can be used for for updating variables on a regular basis. We will be using a timer to implement a polling mechanism to get the latest JPG from an IP security cam.
Let’s have the timer update some variables when it starts (OnTimerStart) and when the timer reaches its timeout (OnTimerEnd) by copying & pasting the following code into the OnTimerStart and OnTimerEnd text fields:
UpdateContext({ImageUrl : BaseUrl & “?rnd=” & Text(Rand())})
This will trigger the image on the canvas to reload itself with the value we are setting here. Because we want to avoid any form of caching we will be adding a random number to the URL, when getting the latest JPG from the IP security cam.
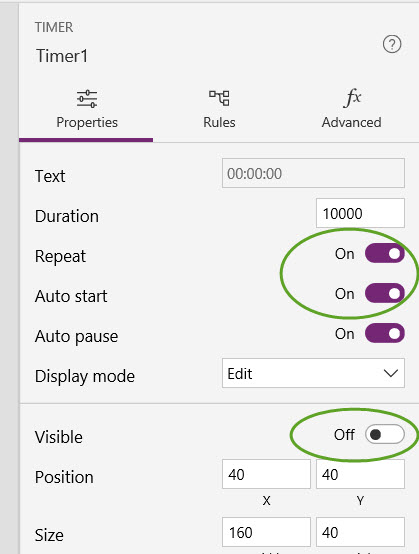
We also need to have the timer restart it self automatically by setting Repeat to true, otherwise it will only fire once.
Let’s also change the duration from 60000 to 10000 so we do not get bored while waiting for the image to update itself.
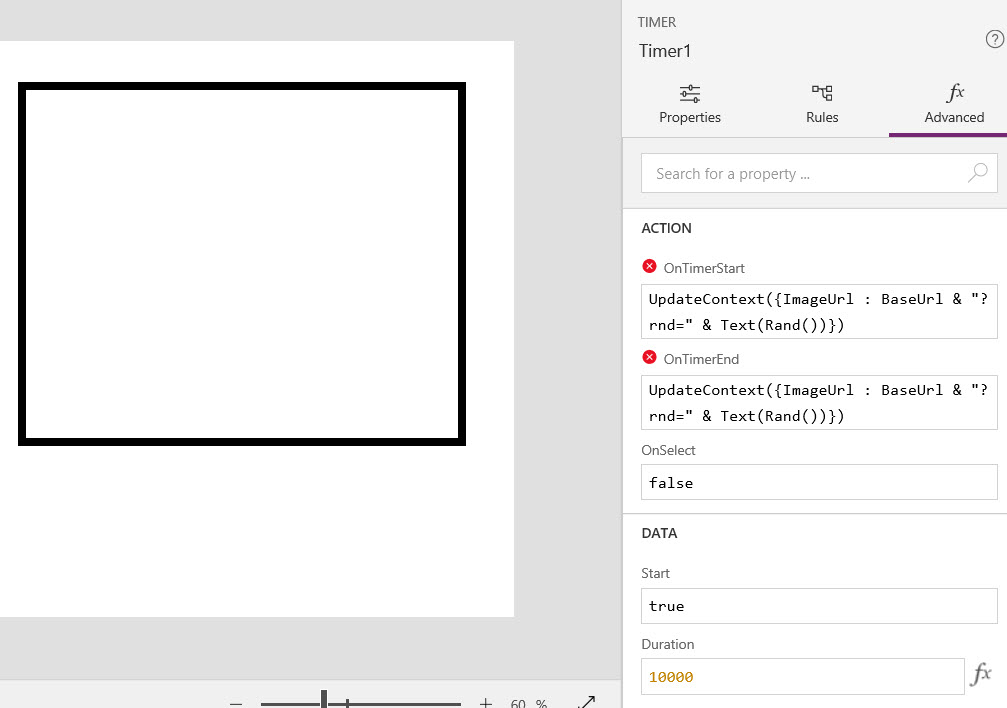
And have the timer automatically start at load of the PowerApps app, and let’s make the timer hidden from view by setting Visible to Off.
We are almost there!
4. Add IP Camera URL
We have a timer that updates the ImageUrl variable, which triggers the reload on the Image. We now have to decide what we will put in the BaseUrl variable.
Note: For this demo, in order for you to see live updates you will need an IP camera that is publicly exposed to the internet. This may require opening a port as “Virtual Server” in your router.
There are many IP camera vendors and different IP cameras have different paths and query strings to get a JPG from the IP camera. In this example I am using a mobile Android device and I have the IP Webcam app installed, made by Pavel Khlebovich. That app turns your (old) Android device into an IP camera and it exposes an endpoint to get a JPG from the camera at http://<some IP address>:<some port>/shot.jpg
So, all we have to do now is regularly set the BaseUrl to the aforementioned url and the IP camera image should show up in the image placeholder on our canvas.
5. Add Thumbnail Image Placeholder
Let’s add another image placeholder on the canvas that will trigger the update of the BaseUrl variable. Click on Image in the Insert \ Media sub menu.

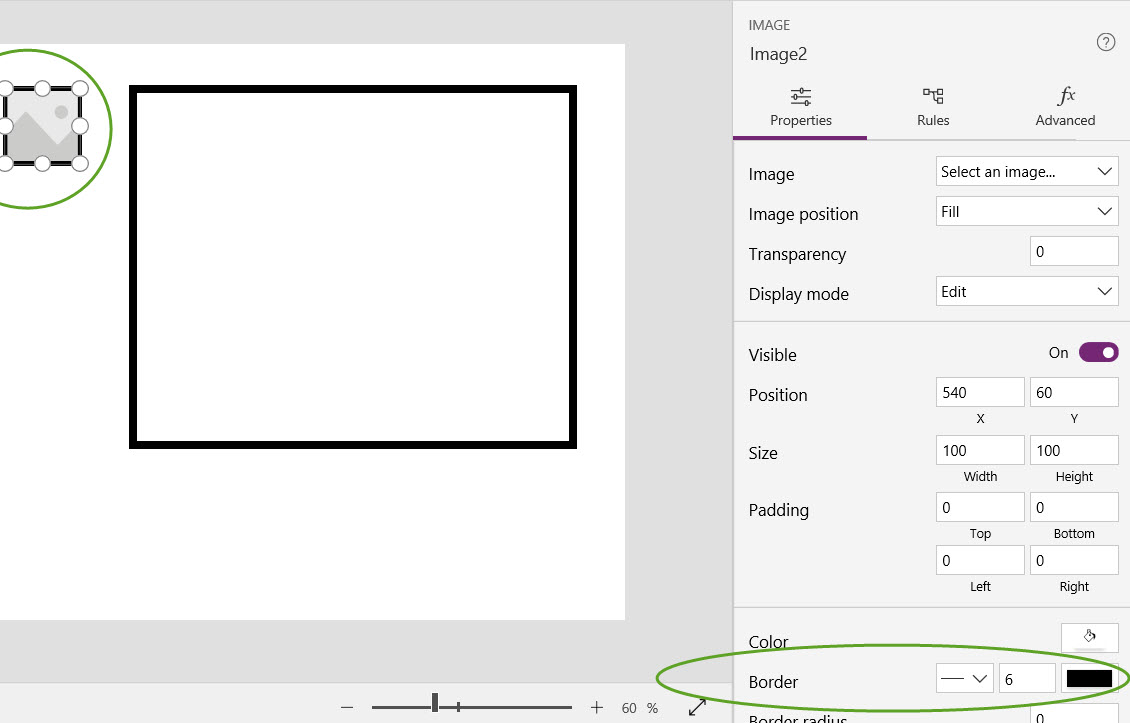
Then let’s move the new image place holder and align it to the left of the big image placeholder we already had. Let’s also change the ImagePosition from ImagePosition.Fit to ImagePosition.Fill so that the thumbnail we are creating here always uses the full width and height available within the image placeholder.
Click on the Properties tab in the properties panel on the right and add a black border of thickness 6:
Now, update the OnSelect property on the Advanced tab of the thumbnail image placeholder and copy & paste the following code:
UpdateContext({BaseUrl: “http://<some IP address>:<some port>/shot.jpg”, ImageUrl: “http://<some IP address>:<some port>/shot.jpg”})
Note: don’t forget to add your IP address and the port to the code block above.
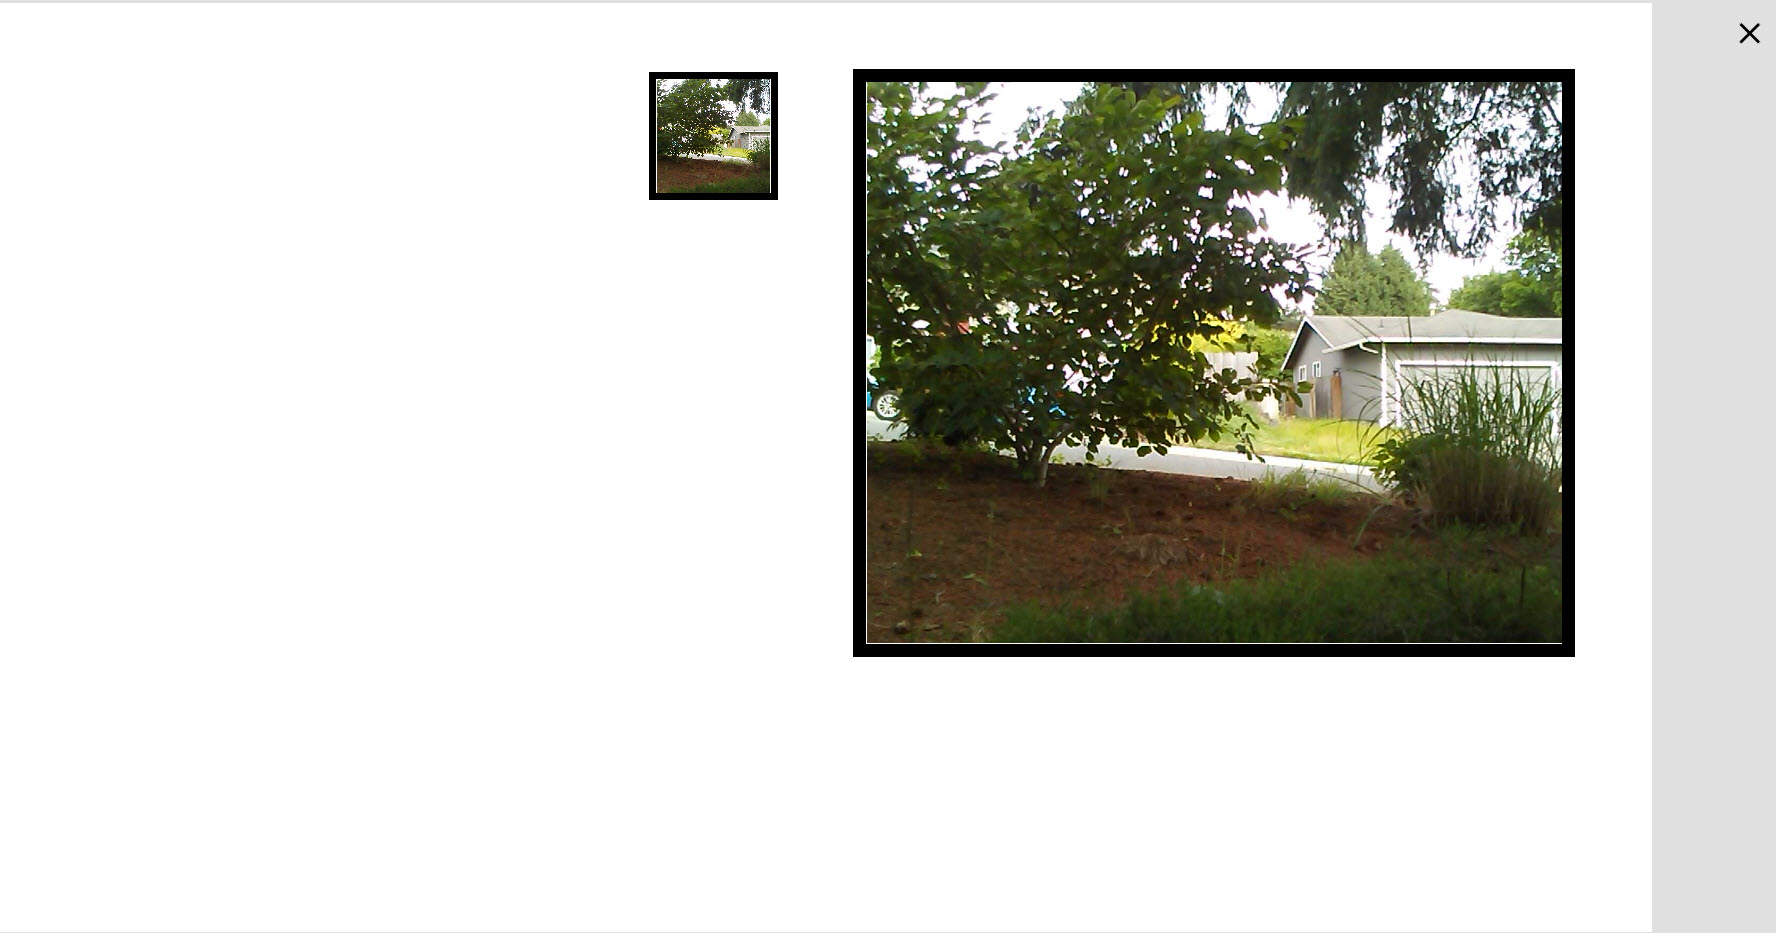
This will make a click on the thumbnail image update the BaseUrl, which in turn will trigger the reload by the timer (which happens in up to 5 seconds because of the duration we set earlier). To also immediately update the image in the full image placeholder, we will also directly update the ImageUrl, triggering the immediate update of the full size image. Otherwise we would have to wait for the time out to kick in and that is not a pleasant user experience.
Also, let’s not forget to make the thumbnail use an actual image from the IP camera, by setting the Image property to “http://<some IP address>:<some port>/shot.jpg” as well. It does not have to be updated periodically, but we should at least know which thumbnail is showing the image of which IP camera (if you add more).
Note: please include the quotes around the URL when setting the Image property. PowerApps expects this to be a string.

Note: don’t forget to add your IP address and the port to the Image url above.
6. Run the PowerApps app
Now, let’s run and test our PowerApps app by clicking on the play icon at the top right corner.

And there we are… we have added one IP camera to our PowerApps app that is periodically updating itself.
7. Beautifying the App
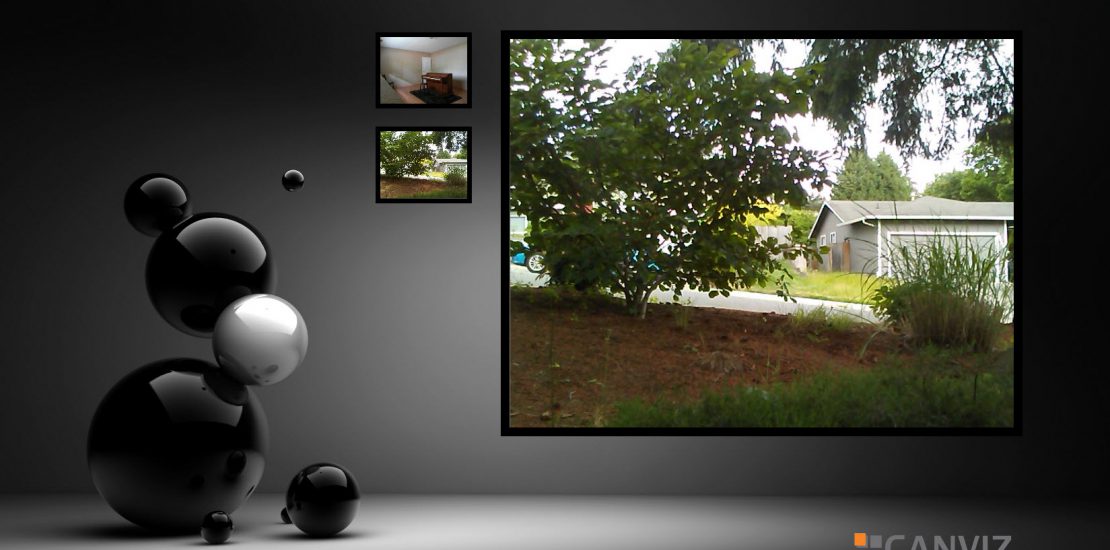
By adding a nice background stock photo to the mix and repeating the previous steps to add a couple more IP cameras we have created a nice visually appealing security camera dashboard.

But there is more! Please check out the next blog in this series where we will add Microsoft Azure features to make this app data-driven and add AI features such as motion detection.
Coming soon on Canviz blog!
8. Conclusion
In this blog post we saw how easy it is to use PowerApps and implement a polling mechanism to create a visually appealing security camera dashboard.
Good day
Could you forward me the next blog i.e. “But there is more! Please check out the next blog in this series where we will add Microsoft Azure features to make this app data-driven and add AI features such as motion detection.”
Hi Mark,
This blog hasn’t been posted yet. Keep an eye out for it.
Hello, this is a great article, however I have not been able to get it to work for me completely. I was able to setup my home amcrest camera where it is accessible via the web via snapshot, but for some reason the power apps doesn’t like cgi??
http://username:password@ISPaddress:8080/cgi-bin/snapshot.cgi