- April 30, 2018
- Posted by: Alec McDaniel
- Categories: Hands-on Labs, How-To

NGINX: Web Server, Reverse Proxy, Load Balancer and HTTP Cache in one
In this article we’ll show you some of the basic features of NGINX that allow you to accelerate content and application delivery, improve security, facilitate availability and scalability of web sites.
NGINX (pronounced as: Engine X) is currently in use by over 25% of the busiest sites in the world. These include Dropbox, Netflix, WordPress, Yandex, VK, etc.
NGINX is also in use by all of the major cloud providers such as Microsoft Azure, Amazon AWS and Google Cloud Compute.
Configuring NGINX can be a daunting task, and is often not straightforward. However, in this lab we will focus on the bare minimum and provide you a few examples of very rudimentary use cases that will give you the confidence to become more versed in NGINX configuration; the first step is always the most important one.
Although NGINX can be used on many different platforms, we will provide these examples in the context of Kuberbetes on Azure Container Services (AKS).
The corresponding source code for this lab can be found here: https://github.com/OGcanviz/tutorial-introduction-to-NGINX
Prerequisites
In order to run the samples in this lab, you will need the following:
– An active Microsoft Azure Subscription
– Azure CLI installed
– Curl command line tool installed (for testing samples in this lab)
– Kubernetes CLI (kubectl) installed
– Open a Command Prompt window (with an active PATH environment variable pointing to Azure CLI and Kubernetes CLI)
1. How to configure NGINX
The configuration file structure of NGINX follows the rules in the NGINX documentation at https://nginx.org/en/docs/beginners_guide.html#conf_structure
NGINX consists of modules which are controlled by directives specified in the configuration file. Directives are divided into simple directives and block directives:
– A simple directive consists of the name and parameters separated by spaces and ends with a semicolon ;.
– A block directive has the same structure as a simple directive, but instead of the semicolon it ends with a set of additional instructions surrounded by braces { and }.
If a block directive can have other directives inside braces, it is called a context (examples: events, http, server, and location).
Directives placed in the configuration file outside of any contexts are considered to be in the main context. The events and http directives reside in the main context, server in http, and location in server.
The rest of a line after the # character is considered a comment.
A very rudimentary configuration file looks like this:
http {
server {
location / {
}
}
}
Generally, the configuration file may include several server blocks distinguished by ports which they listen to and by server names. Once NGINX decides which server processes a request, it tests the URI specified in the request’s header against the parameters of the location directives defined inside the server block.
2. Serving static responses with NGINX
It is relatively easy to serve static responses straight from NGINX.
Consider the following example configuration file:
http {
server {
listen 80;
location / {
return 200 ‘Eureka!’;
}
}
}
This implementation shows the text Eureka! when accessed through port 80. Mind the / that indicates the root of the web server. So, if our NGINX implementation was deployed as localhost, browsing to http://localhost/ would result in the following response: Eureka!
3. Serving static files with NGINX
http {
server {
listen 80;
location / {
root /data/www;
}
}
}
This implementation hosts files from the /data/www folder as root of the web site http://localhost/
3.1 Serving static files for multiple locations with NGINX
http {
server {
listen 80;
location / {
root /data/www;
}
location /images {
root /data/images;
}
}
}
This implementation hosts files from the /data/www folder as root of the web site http://localhost/ identical to the previous example.
However, a request to http://localhost/images will first be matched against /data/www/images to form the path on the local system where it will try to find the resource. But since there is also a match for http://localhost/images through the /images prefix, that one prevails over the shorter / prefix.
Note: Of all the matching location definitions, NGINX selects the one with the longest prefix.
So, in the above example http://localhost/images will return the resource located at /data/images.
4. Serving an index file
http {
server {
listen 80;
location / {
index index.php index.htm index.html;
root /data/www;
}
}
}
This configuration allows our NGINX implementation http://localhost to be matched with an index file in /data/www. The first match found is being served as an index file as response to the request of http://localhost.
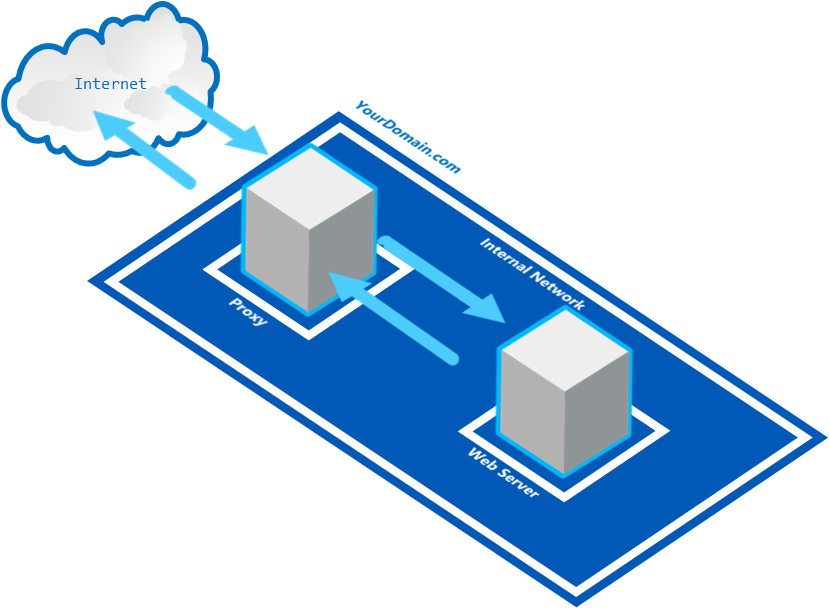
5. Create a simple proxy with NGINX
A proxy server is a server that breaks the connection between sender and receiver. The proxy server will evaluate the incoming request and, if allowed, relays it to the outgoing side with the receiver.
http {
server {
location / {
proxy_pass http://someserver:8080/;
}
location ~ \.(gif|jpg|png)$ {
root /data/images;
}
}
}
The configuration above serves all requests ending with .gif, .jpg or .png from the /data/images folder and pass all other requests on to the proxied server someserver on port 8080.
6. Create a load balancer with NGINX
http {
upstream backend {
server backend1.yourdomain.com weight=5;
server backend2.yourdomain.com;
}
server {
location / {
proxy_pass http://backend/;
}
}
}
This configuration would route 83.33% (= 5/6) of the requests to the backend1 server and the rest of the requests to backend2.
7. Hands-on NGINX with Kubernetes and AKS
In this section we’ll explain to you how you can run and test the above NGINX configuration samples in Kubernetes and Azure Container Services (AKS).
7.1. First time set up
If you never used Azure CLI or Kubernetes CLI before, or have used it but for a different subscription, you need to link your Azure subscription to the local Kubernetes configuration.
7.1.1 Kubernetes CLI Local Configuration
If you are using the Kubernetes CLI on a windows machine, it expects a config file in this folder location:
%USERPROFILE%\.kube
For instance, if your user name is TestUser, you may find the kubectl config file in C:\Users\TestUser\.kube
Optionally: If your Kubernetes configuration file is located elsewhere, in order for the Kubernetes CLI (kubectl) to find your configuration, you need to add the above path (including the ‘config‘ file name) to the KUBECONFIG environment variable in a Command Prompt window, as such:
SET KUBECONFIG=c:\pathtokubeconfig\config
7. 1.2 Logging into Azure from the Command Line
In order for the kubectl statements below to be fired against the correct Azure Kubernetes (AKS) instance, you need to link your Azure subscription to the local Kubernetes configuration.
First you need to sign in, by entering the following command in a Command Prompt window:
az login
This will result in the following output:
To sign in, use a web browser to open the page https://aka.ms/devicelogin and enter the code B9R2CY8ZP to authenticate.To sign in, use a web browser to open the page https://aka.ms/devicelogin and enter the code B9R2CY8ZP to authenticate.
Next, open a browser and go to https://aka.ms/devicelogin and type in the code as returned from the az login command: B9R2CY8ZP

This will authenticate your device against Azure and a response similar to this should appear in your Command Prompt window:
[
{
“cloudName”: “AzureCloud”,
“id”: “3b7912c3-ad06-426e-8627-419123727111”,
“isDefault”: true,
“name”: “CanvizDev”,
“state”: “Enabled”,
“tenantId”: “3dad2b09-9e66-4eb8-9bef-9f44544b0222”,
“user”: {
“name”: “testuser@canviz.com”,
“type”: “user”
}
}
]
7.1.3 Linking your Azure subscription
Next, you need to link your Azure subscription so that the Azure CLI (az) will work against your environment.
az account set –subscription “3b7912c3-ad06-426e-8627-419123727111”
7.1.4 Getting Kubernetes configuration from Azure
First, let’s make a new resource group in “eastus” (the name of the region in Eastern U.S.), just for this example:
az group create –name “TestKub” –location=”eastus”
This will result in an output like this:
{
“id”: “/subscriptions/3b7912c3-ad06-426e-8627-41912372774b/resourceGroups/TestKub”,
“location”: “eastus”,
“managedBy”: null,
“name”: “TestKub”,
“properties”: {
“provisioningState”: “Succeeded”
},
“tags”: null
}
And also a small Kubernetes cluster to run our examples in:
az aks create –name TestKub –resource-group TestKub –location “eastus” –-node-count 1 –generate-ssh-keys
Note: This process may take a few minutes to complete.
Then, we can make sure we can use Azure Container Service (AKS) as our context for when we run kubectl commands, by entering the following command:
az aks get-credentials –resource-group TestKub –name TestKub
where TestKub is the name of a Resource Group you have created before (or alternatively in the Azure Portal) and TestKub is the name of the Managed Container Service (AKS, not ACS!) you created above.
If successful, this will result in the following output:
Merged “TestKub” as current context in C:\Users\TestUser\.kube\config
Optionally: Set the context, if you have used other Kubernetes clusters before.
If you have been developing against a local or a different Kubernetes cluster, your current kubectl configuration may point to a different cluster. To correct this, please use the following command:
kubectl config set-context TestKub
7.1.5 Verify the correct Kubernetes cluster
In order to verify that we are indeed talking to the correct Kubernetes cluster, we can use the following command:
kubectl cluster-info
The output of this command should look similar to this:
Kubernetes master is running at https://testkub-77a9ac84.hcp.eastus.azmk8s.io:443
Heapster is running at https://testkub-77a9ac84.hcp.eastus.azmk8s.io:443/api/v1/namespaces/kube-system/services/heapster/proxy
KubeDNS is running at https://testkub-77a9ac84.hcp.eastus.azmk8s.io:443/api/v1/namespaces/kube-system/services/kube-dns:dns/proxy
kubernetes-dashboard is running at https://testkub-77a9ac84.hcp.eastus.azmk8s.io:443/api/v1/namespaces/kube-system/services/kubernetes-dashboard/proxy
If the URLs in the output point to localhost, please use the kubectl config set-context command to change the context to the correct cluster.
7.1.6. Preparing an NGINX configuration file for use with Kubernetes
In order for Kubernetes to start an NGINX instance with your customized request splitting configuration (instead of the default configuration), there are a number of steps we need to perform:
1. We need to create a custom NGINX .conf configuration file.
2. We need to make the custom NGINX configuration file readable to a Kubernetes pod by generating a ConfigMap object.
3. We need to reference the NGINX configuration from our Deployment configuration files (written in Yaml format).
3. We need to verify that the custom NGINX configuration file is successfully picked up by Kubernetes during deployment.
First, we will generate a custom NGINX configuration file that serves our need.
Note: Unlike some of the examples on the web, ConfigMaps must be mounted as directories! Not as files. This is why the nginx-staticresponse.conf file has to be placed in a folder.
Note: Also, if you are more experienced with NGINX configuration files: NGINX configuration for Kubernetes cannot contain any top level configuration attributes such as http, worker processes, etc. You will need to strip those from your .conf file.
7.2. Serving a Static Response
In this section we’ll guide you through the steps to:
– Create a ConfigMap object
– Create a Kubernetes Pod and Deployment
– Expose a Kubernetes Pod
– Test a Kubernetes Pod
Note: You will need to repeat these steps for each of the samples in this article.
7.2.1. Create ConfigMap object
Let’s consider the configuration file nginx-staticresponse.conf:
server {
listen 80;
location / {
return 200 ‘Eureka!’;
}
}
Note: Notice that we have stripped the top-level http { } block from our .conf file.
Now, let’s run the command that will generate a ConfigMap for our custom NGINX ambassador configuration file:
kubectl create configmap staticresponse-config –from-file=conf.d
Note: Make sure you run this command from the working folder that contains the conf.d sub folder.
7.2.2. Create Kubernetes Deployment
Next, we will reference the newly created ConfigMap in our Deployment yaml file:
apiVersion: apps/v1beta1 # for versions before 1.9.0 use apps/v1beta2
kind: Deployment
metadata:
name: staticresponse-deployment
spec:
selector:
matchLabels:
app: staticresponse
replicas: 2 # tells deployment to run 2 pods matching the template
template: # create pods using pod definition in this template
metadata:
# unlike pod-nginx.yaml, the name is not included in the meta data as a unique name is
# generated from the deployment name
labels:
app: staticresponse
spec:
containers:
– image: nginx
name: staticresponse
ports:
– containerPort: 80
volumeMounts:
– name: config-volume
mountPath: /etc/nginx/conf.d
volumes:
– name: config-volume
configMap:
name: staticresponse-config
Note: It is extremely important when constructing Yaml files to follow the exact indentation from the samples for the configuration elements, as Yaml is extremely sensitive to that and your deployment may fail for unclear reasons because of wrong indentation.
Note: Also, NO tabs can be used for indentation, only spaces. Make sure your code editor doesn’t convert spaces into tabs or adds tabs when adding a carriage return. And also make sure when copy & pasting this code, the indentation isn’t changed or replaced by tabs.
And then we will deploy the Kubernetes pods with the following statement:
kubectl create -f staticresponse-deployment.yaml
7.2.3. Expose the Kubernetes Pod
Now the deployment is created, however we are not there yet. In order for us to access the deployment from the outside world, we need to expose the deployment by using this command:
kubectl expose deployment staticresponse-deployment –port=80 –type=LoadBalancer
This will create two pods and an NGINX Load Balancer that will load balance requests between the two pods.
7.2.4. Verify the Kubernetes deployment of the NGINX Static Reponse Web Server
In order to see if our pods and deployments actually exist and have succeeded, we’ll use the following commands:
kubectl get pods –output=wide
This will result in an output similar to this:
NAME READY STATUSRE STARTS AGE IP NODE
staticresponse-deployment-2259644619-2573j 1/1 Running 0 <invalid> 10.244.0.119 aks-agentpool-25428128-1
staticresponse-deployment-2259644619-tbbcx 1/1 Running 0 <invalid> 10.244.1.109 aks-agentpool-25428128-0
By executing the following command, we’ll be notified when AKS has issued an IP address for our pod so we can test it from the outside world.
kubectl get services –watch
Note: the –watch flag will wait for the IP address to be populated and show the assigned IP address once available.
Which results in an output similar to this:
NAME TYPE CLUSTER-IP EXTERNAL-IP PORT(S) AGE
staticresponse-deployment LoadBalancer 10.0.237.65 <pending> 80:30698/TCP 1m
kubernetes ClusterIP 10.0.0.1 <none> 443/TCP 5d
And once the IP address has become available:
NAME TYPE CLUSTER-IP EXTERNAL-IP PORT(S) AGE
staticresponse-deployment LoadBalancer 10.0.237.65 13.90.241.40 80:30698/TCP 1m
kubernetes ClusterIP 10.0.0.1 <none> 443/TCP 5d
Now, we can test our pod deployment by accessing the EXTERNAL-IP from a browser or a cURL statement:
curl 13.90.241.40
Eureka!
Eureka! Our first NGINX deployment in Kubernetes on AKS succeeded!
7.3. Serving Static Files
Consider the following NGINX configuration file nginx-staticfiles.conf
server {
listen 80;
location / {
root /data/www;
}
}
If we create a ConfigMap object from this NGINX configuration file as explained before:
kubectl create configmap staticfiles-config –from-file=conf.d
And since a ConfigMap object in essence is just a collection of key value pairs, we can (ab)use the same mechanism to create a ConfigMap object of our /www folder (containing a sample index.html file), like this:
kubectl create configmap staticfiles-www –from-file=www
We can reference both ConfigMap objects as volumes while deploying our pods:
apiVersion: apps/v1beta1 # for versions before 1.9.0 use apps/v1beta2
kind: Deployment
metadata:
name: staticfiles-deployment
spec:
selector:
matchLabels:
app: staticfiles
replicas: 2 # tells deployment to run 2 pods matching the template
template: # create pods using pod definition in this template
metadata:
# unlike pod-nginx.yaml, the name is not included in the meta data as a unique name is
# generated from the deployment name
labels:
app: staticfiles
spec:
containers:
– image: nginx
name: staticfiles
ports:
– containerPort: 80
volumeMounts:
– name: config-volume
mountPath: /etc/nginx/conf.d
– name: www-volume
mountPath: /data/www
volumes:
– name: config-volume
configMap:
name: staticfiles-config
– name: www-volume
configMap:
name: staticfiles-www
Now, let’s create the deployment:
kubectl create -f staticfiles-deployment.yaml
And expose the deployment to the outside world:
kubectl expose deployment staticfiles-deployment –port=80 –type=LoadBalancer
Then we can list our Kubernetes pods:
kubectl get pods –output=wide
And wait for the EXTERNAL-IP address to become available with:
kubectl get services –watch
After which we can browse to the external IP address:
curl 52.234.148.187
Which should result in:
<html>
<body>
Static Eureka!
</body>
</html>
7.4 Serving Multiple Static Files
In similar fashion we can serve multiple static files by expanding our location block, so we can also serve some images from our server:
Consider the following NGINX configuration file nginx-staticfilesmulti.conf
server {
listen 80;
location /images {
# the location path is added to the root to make the full path
root /data;
}
location / {
root /data/www;
}
}
If we create a ConfigMap object from this NGINX configuration file as explained before:
kubectl create configmap staticfilesmulti-config –from-file=conf.d
And since a ConfigMap object in essence is just a collection of key value pairs, we can (ab)use the same mechanism to create a ConfigMap object of our /www folder (containing a sample index.html file), like this:
kubectl create configmap staticfilesmulti-www –from-file=www
As well as our /images folder, which for sake of demonstration even contains a binary PNG picture:
kubectl create configmap staticfilesmulti-images –from-file=images
We can reference all three ConfigMap objects as volumes while deploying our Kubernetes pod:
apiVersion: apps/v1beta1 # for versions before 1.9.0 use apps/v1beta2
kind: Deployment
metadata:
name: staticfilesmulti-deployment
spec:
selector:
matchLabels:
app: staticfilesmulti
replicas: 2 # tells deployment to run 2 pods matching the template
template: # create pods using pod definition in this template
metadata:
# unlike pod-nginx.yaml, the name is not included in the meta data as a unique name is
# generated from the deployment name
labels:
app: staticfilesmulti
spec:
containers:
– image: nginx
name: staticfilesmulti
ports:
– containerPort: 80
volumeMounts:
– name: config-volume
mountPath: /etc/nginx/conf.d
– name: www-volume
mountPath: /data/www
– name: images-volume
mountPath: /data/images
volumes:
– name: config-volume
configMap:
name: staticfilesmulti-config
– name: www-volume
configMap:
name: staticfilesmulti-www
– name: images-volume
configMap:
name: staticfilesmulti-images
Now, let’s create the deployment:
kubectl create -f staticfilesmulti-deployment.yaml
And expose the deployment to the outside world:
kubectl expose deployment staticfilesmulti-deployment –port=80 –type=LoadBalancer
Then we can list our Kubernetes pods:
kubectl get pods –output=wide
And wait for the EXTERNAL-IP address to become available with:
kubectl get services –watch
After which we can browse to the external IP address:
curl 52.234.148.187
Which should result in:
<html>
<body>
Static Eureka!
</body>
</html>
And
curl http://52.234.148.187/images/index.html
Which results in:
IMAGES FOLDER!
Or, if we want to get the Canviz.png binary:
curl http://52.234.148.187/images/Canviz.png –output –
Which will result in a messy terminal output and most likely a bunch of beeps.
8. Debugging NGINX
8.1 NGINX log files
In case NGINX does not work as expected, you may try to find out the reason in access.log and error.log files in the directory /usr/local/nginx/logs or /var/log/nginx.
8.2. Accessing the NGINX log files from within the pod
This statement will fire up a curl image INSIDE the pod. This allows you to execute the curl statement against the internal IP address, rather than having to wait for the external IP address to get populated:
kubectl run curl-staticfilesmulti-deployment –image=radial/busyboxplus:curl -i –tty –rm
9. Conclusion
Although not straightforward, we showed that firing up a simple web server in NGINX isn’t rocket science either. By also showing how to do this inside a Kubernetes cluster in AKS we hope we have given you an idea of the diversity of platforms that use NGINX out there. Having basic NGINX knowledge can really be beneficial to you if you ever are tasked with setting up a load balancing web server in the cloud, whether it be AWS, Azure, Google or any other platform, chances are you may come in contact with NGINX at one point.
10. More Information
To learn all about NGINX, we encourage you to read the book NGINX Cookbook by Derek DeJonghe: https://www.nginx.com/resources/library/complete-nginx-cookbook/