- April 5, 2018
- Posted by: Alec McDaniel
- Category: Hands-on Labs
Ramping up on Kubernetes can be a challenging experience. Lack of clear and simple examples makes it hard to grasp this relatively new and complex technology. Development of Kubernetes is going fast and customers are requesting containerized solutions today.
In this blog post series we will try make your entry into the market of containerized applications (and Kubernetes in particular) a smooth one. As Microsoft Partner we suggest Azure Container Service (AKS), as they offer relatively simple deployment procedures, but Kubernetes runs on AWS, Google and other cloud providers as well.
Although I am a big fan of GUIs, I will be using mostly CLI commands in this lab so that it is more transparent to you what is actually happening under the hood.
The corresponding source code for this lab can be found here: https://github.com/OGcanviz/tutorial-basic-kubernetes-in-AKS/tree/master/1-basic-pod
Prerequisites
There are a couple of things you will need to set up before you can actually start playing around with Kubernetes on Azure Container Service (AKS):
- You will need to set up a Microsoft Azure Subscription, if you don’t already have one.
- You need to install Azure CLI
- You need to install the cURL tool. We will be using cURL to call our web server from the command-line.
- You need to install kubectl, the command line tool of Kubernetes.
- Finally, you need to open a Command Prompt window (with an active PATH environment variable pointing to Azure CLI and Kubernetes CLI)
First time set up
If you never used Azure CLI or Kubernetes CLI before or have used it but for a different subscription, you need to link your Azure subscription to the local Kubernetes configuration.
Kubernetes CLI Local Configuration
If you are using the Kubernetes CLI on a windows machine, it expects a config file in this folder location:
%USERPROFILE%\.kube
For instance, if your user name is TestUser, you may find the kubectl config file in C:\Users\TestUser\.kube
Optionally: If your Kubernetes configuration file is located elsewhere, in order for the Kuberneter CLI (kubectl) to find your configuration, you need to add the above path (including the ‘config’ file name) to the KUBECONFIG environment variable in a Command Prompt window, as such:
SET KUBECONFIG=c:\pathtokubeconfig\config
Logging into Azure from the Command Line
In order for the kubectl statements below to be fired against the correct Azure Kubernetes (AKS) instance, we need to link your Azure subscription to the local Kubernetes configuration.
First you need to sign in, by entering the following command in a Command Prompt window:
az login
This will result in the following output:
To sign in, use a web browser to open the page https://aka.ms/devicelogin and enter the code B9R2CY8ZP to authenticate.
Now, you need to open a browser and go to https://aka.ms/devicelogin and type in the code as returned from the az login command:B9R2CY8ZP

This will authenticate your device again Azure and a response similar should appear in your Command Prompt window:
[
  {
    "cloudName": "AzureCloud",
    "id": "3b7912c3-ad06-426e-8627-419123727111",
    "isDefault": true,
    "name": "CanvizDev",
    "state": "Enabled",
    "tenantId": "3dad2b09-9e66-4eb8-9bef-9f44544b0222",
    "user": {
      "name": "testuser@canviz.com",
      "type": "user"
    }
  }
]
Linking your Azure subscription
Next, you need to link your Azure subscription so that the Azure CLI (az) will work against your environment.
az account set --subscription "3b7912c3-ad06-426e-8627-419123727111"Create a Resource Group
To group all the work we will be doing in this lab together, we’ll create a new Resource Group.
az group create --name TestKub --location "eastus"Create an Kubernetes Cluster on Azure Container Service (AKS)
az aks create --resource-group TestKub --name TestKub --node-count 1 --generate-ssh-keys
> Note: this process can take a few minutes
Getting Kubernetes configuration from Azure
Then, we can make sure we can use Azure Container Service (AKS) as our context for when we run kubectl commands, by entering the following command:
az aks get-credentials --resource-group TestKub --name TestKubIf successful, this will result in the following output:
Merged "TestKub" as current context in C:\Users\TestUser\.kube\config
Optionally: Set the context, if you have used other Kubernetes clusters before
If you have been developing against a local or a different Kubernetes cluster, your current kubectl configuration may point to a different cluster. To correct this, please use the following command:
kubectl config set-context TestKub
Verify the correct Kubernetes cluster
In order for us to verify that we are indeed talking to the correct Kubernetes cluster, we can use the following command:
kubectl cluster-info
The output of this command should look similar to this:
Kubernetes master is running at https://testkub-77a9ac84.hcp.eastus.azmk8s.io:443
Heapster is running at https://testkub-77a9ac84.hcp.eastus.azmk8s.io:443/api/v1/namespaces/kube-system/services/heapster/proxy
KubeDNS is running at https://testkub-77a9ac84.hcp.eastus.azmk8s.io:443/api/v1/namespaces/kube-system/services/kube-dns:dns/proxy
kubernetes-dashboard is running at https://testkub-77a9ac84.hcp.eastus.azmk8s.io:443/api/v1/namespaces/kube-system/services/kubernetes-dashboard/proxy
If the URLs in the output point to localhost, please use kubectl config set-context command to change the context to the correct cluster.
Now, you have set up your Kubernetes Cluster and it is ready for use.
1. Create an Nginx configuration file

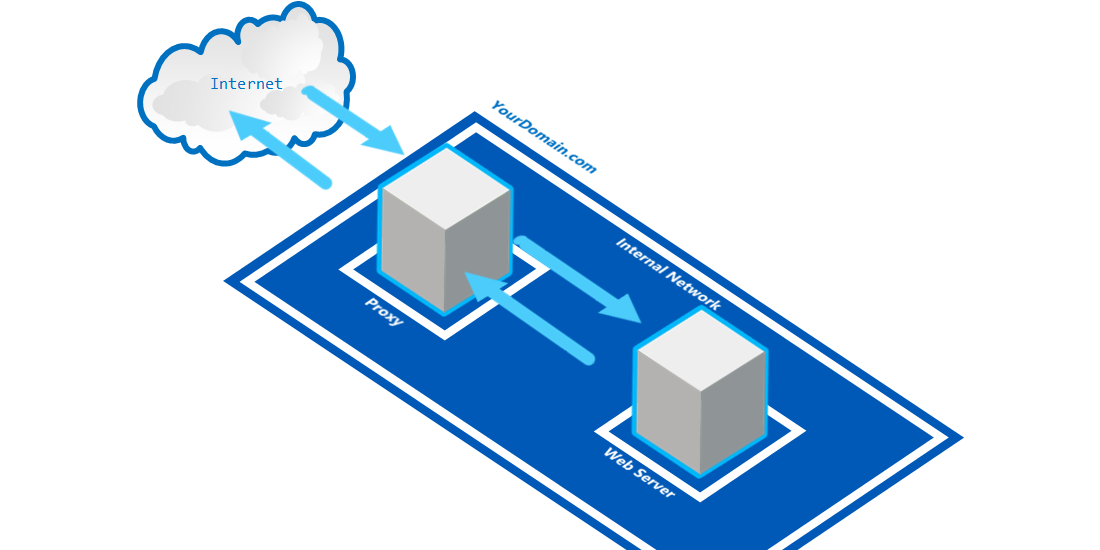
Nginx (pronounced as: Engine X) is an HTTP and reverse proxy server, a mail proxy server, and a generic TCP/UDP proxy server. It is offered as part of Kubernetes as an advanced Layer 7 load‑balancing solution for exposing Kubernetes services to the Internet.
The way Nginx and its modules work is determined in the configuration file. By default, the configuration file is named nginx.conf and placed in the directory /usr/local/nginx/conf , /etc/nginx , or /usr/local/etc/nginx
1.1 Creating an Nginx pod with Default Configuration
Firing up a default Nginx instance within Kubernetes is easy:
kubectl run my-nginx --image=nginx --replicas=2 --port=80
The kubectl run line above will create two nginx pods listening on port 80. It will also create a deployment named my-nginx to ensure that there are always two pods running.
At this point, the two pods are not yet accessible from the outside world. For that we need to expose a deployment:
kubectl expose deployment my-nginx --port=80 --type=LoadBalancer
Now, Kubernetes will create an external IP address for you, so you can access the pods from your web browser.
In order for you to see what IP address is created, you can run the following command:
kubectl get services --watch
Note: the –watch flag will wait for the IP address to be populated and show the assigned ip address once available
Which results in an output similar to this:
 kubernetes    ClusterIP          10.0.0.1          <none>         443/TCP            1d
 my-nginx   LoadBalancer       10.0.179.76       <pending>      80:31102/TCP       <invalid>
And once the IP address has become available:
kubernetes ClusterIP          10.0.0.1          <none>             443/TCP            1d
my-nginx   LoadBalancer       10.0.179.76       13.92.209.60       80:31102/TCP    6m
Now, we can use a cURL statement (as alternative to open a web browser) to see if we get a response back from our Nginx instance:
curl "http://13.92.209.60"
Which should result in an output similar to this:
<!DOCTYPE html>
<html>
<head>
<title>Welcome to nginx!</title>
<style>
body {
width: 35em;
margin: 0 auto;
font-family: Tahoma, Verdana, Arial, sans-serif;
}
</style>
</head>
<body>
<h1>Welcome to nginx!</h1>
<p>If you see this page, the nginx web server is successfully installed and
working. Further configuration is required.</p>

<p>For online documentation and support please refer to
<a href="http://nginx.org/">nginx.org</a>.<br/>
Commercial support is available at
<a href="http://nginx.com/">nginx.com</a>.</p>

<p><em>Thank you for using nginx.</em></p>
</body>
</html>
Yay! Our Nginx load balancer is running!
However, in this case the default configuration is used, which is not always desired. We may want to customize the Nginx configuration to meet our needs.
1.2 Create a custom Nginx configuration for Kubernetes
In order for Kubernetes to start an Nginx instance with your customized configuration (instead of the default configuration), there are a number of steps we need to perform:
- We need to create a custom Nginx
.confconfiguration file - We need to make the custom Nginx configuration file readable to a Kubernetes pod by generating a
ConfigMap - We need to reference the Nginx configuration from our Pod and Deployment configuration files (written in Yaml format)
- We need to verify that the custom Nginx configuration file is successfully picked up by Kubernetes during deployment
First, we will generate a custom Nginx configuration file. As an example we will be creating a simple Nginx implementation that returns a fixed string Eureka! for all root level HTTP requests. So, the expected result here for an HTTP request to http://13.92.209.60 isEureka!
Note: Technically we are not implementing an actual Application Container here, but for simplicity we will be mimicking a web server returning a fixed string
Eureka!. In essence thelocationdefinition in the Nginx configuration has become our Application Container in this example.
Sample custom Nginx configuration nginx-basic.conf:
The following configuration would route every HTTP request to / to a text/plain response with the text Eureka!
server {
    location / {
        return 200 'Eureka!';
        add_header Content-Type text/plain;
    }
}
Now, in order for Kubernetes to understand this Nginx-specific configuration, we need to make it readable by creating a ConfigMap object from this file. In essence, a ConfigMap object is a collection of key-value pairs that can be mounted to a volume inside the Kubernetes pod.
If you’d like you can read more about ConfigMap here: https://kubernetes.io/docs/tasks/configure-pod-container/configure-pod-configmap/
Generating a ConfigMap for the custom Nginx configuration
In a working folder of your choice, please create a conf.d sub-folder. Then create a nginx-basic.conf file in that folder and copy the following configuration code block into the new nginx-basic.conf file:
server {
    location / {
        return 200 'Eureka!';
        add_header Content-Type text/plain;
    }
}
And save the file. You should now have a nginx-basic.conf file in the conf.d folder.
Note: Unlike some of the examples on the web,
ConfigMapsmust be mounted as directories! Not as files. This is why thenginx-basic.conffile has to be placed in a folder.Note: Also, if you are more experienced with Nginx configuration files: Nginx configuration for Kubernetes cannot contain any top level configuration attributes such as
http,worker processes, etc. You will need to strip those from your.conffile.
Now, let’s run the command that will generate a ConfigMap for our custom Nginx configuration file:
kubectl create configmap basic-config --from-file=conf.d
Note: Make sure you run this command from the working folder that contains the
conf.dsub folder you created earlier.
Reference our custom Nginx configuration from our Pod and Deployment configuration files
When we construct our Pod and Deployment Yaml files, we need to make sure we reference our custom Nginx configuration correctly, otherwise the deployment may fail or the deployment may succeed, but with the default Nginx configuration.
As we will see later when constructing the Pod and Deployment Yaml files, you will need a section in your Yaml files similar to this:
spec:
  containers:
  - name: basic
    image: nginx
    volumeMounts:
    - name: basic-config
      mountPath: /etc/nginx/conf.d
  volumes:
    - name: basic-config
      configMap:
        name: basic-config
Note: It is extremely important when constructing Yaml files to follow the exact indentation from the samples for the configuration elements, as Yaml is extremely sensitive to that and your deployment may fail for unclear reasons because of wrong indentation.
Note: Also, NO tabs can be used for indentation, only spaces. Make sure your code editor doesn’t convert spaces into tabs or adds tabs when adding a carriage return. And also make sure when copy & pasting this code, the indentation isn’t changed or replaced by tabs.
2. Create a Kubernetes Pod
![]()
Kubernetes is an open-source system for automating deployment, scaling and management of containerized applications that was originally designed by Google and now maintained by the Cloud Native Computing Foundation.
Azure Container Service (AKS) manages your hosted Kubernetes environment, making it quick and easy to deploy and manage containerized applications without container orchestration expertise
In this lab we will be creating a simple load balancing Pod that will return a fixed string for an HTTP request.
In the paragraph above we learned how to create a custom Nginx configuration to return a fixed string from an Nginx implementation and how to create a ConfigMap that can be read by Kubernetes when deploying your pod.
The following Yaml file is used to create our simple load balancing pod:
apiVersion: v1
kind: Pod
metadata:
  name: basic-pod
spec:
  containers:
    - name: basic
      image: nginx
      volumeMounts:
      - name: basic-config
        mountPath: /etc/nginx/conf.d
  volumes:
    - name: basic-config
      configMap:
        name: basic-config
Then, we ask Kubernetes to generate the pod for us by using the following command:
kubectl create -f basic-pod.yaml
3. Deploy a Kubernetes Pod
Now the pod should be defined, however this does not yet actually deploy our pod. For that we need to execute the following command:
kubectl create -f basic-deployment.yaml
4. Expose a Kubernetes Pod Deployment
Now the deployment is created, however we are not there yet. In order for us to access the deployment from the outside world, we need toexpose the deployment by using this command:
kubectl expose deployment basic-deployment --port=80 --type=LoadBalancer
5. Confirm Kubernetes Pod Deployment
5.1 List your pods
In order to see if our pods and deployments actually exist and have succeeded, we’ll use the following commands:
kubectl get pods --output=wide
This will result in an output similar to this:
NAME                                READY STATUS    RESTARTS       AGE   IP            NODE
basic-deployment-1236939662-mfq4f   1/1   Running   0              36m   10.244.0.70   aks-agentpool-25428128-1
basic-deployment-1236939662-rzlqw   1/1   Running   0              36m   10.244.1.91   aks-agentpool-25428128-0
basic-pod                           1/1   Running   0              36m   10.244.0.69   aks-agentpool-25428128-1
The items basic-deployment-1236939662-mfq4f and basic-deployment-1236939662-rzlqw refer to the two replicas as defined in yourbasic-deployment.yaml file.
The basic-pod refers to the pod we created with basic-pod.yaml.
Note: if the STATUS is not equal to Running, there are several things you can do to debug the issue (see bottom of this page).
5.2 List your deployments
By executing the following command, we’ll be notified when AKS has issued an IP address for our pod so we can test it from the outside world.
kubectl get services --watch
Which will result in an output similar to this:
NAME                   TYPE               CLUSTER-IP        EXTERNAL-IP        PORT(S)            AGE
basic-deployment       LoadBalancer       10.0.163.91       52.186.69.82       80:31277/TCP       1h
6. Test the Kubernetes Pod Deployment
Since AKS issued an EXTERNAL-IP as we can see from the output of our kubectl get services statement, we can now go to a web browser and navigate to http://52.186.69.82 or use cURL to see the output of our load balanced custom Nginx implementation:
curl "http://52.186.69.82/"
Which should result in the following output:
Gangnam Style!
7. Debugging your Kubernetes Pod Deployment
Deploying a pod, deployment or a service with Kubernetes can be a daunting task.
However, here are a few commands that will be able to guide you to potential problems with your configuration:
7.1. Inspect the active configuration of a pod
After you have executed the statement kubectl get pods you will get a list of pods and their unique names:
NAME                                READY STATUS    RESTARTS       AGE
basic-deployment-1236939662-mfq4f   1/1   Running   0              1h
basic-deployment-1236939662-rzlqw   1/1   Running   0              1h
basic-pod                           1/1   Running   0              1h
Then, by executing the following command, you can get back from Kubernetes the Yaml configuration that it used to deploy that particular pod:
kubectl get pod basic-deployment-1236939662-mfq4f -o yaml
This can give you information on which Nginx configuration is actually used. If the output of the statement above doesn’t match the Yaml you provided this may point you in the right direction of solving your issue.
7.2. Inspecting the logs of a pod
The following statement returns the access logs of a pod:
kubectl logs basic-deployment-1236939662-mfq4f
Which in case the pod is running correctly, returns an output similar to this:
10.240.0.5 - - [16/Feb/2018:21:50:31 +0000] "GET / HTTP/1.1" 200 14 "-" "curl/7.58.0" "-"
If there is something wrong with the pod, deployment or the load balancer, the result from this statement may be an empty string.
7.3. Perform a cURL statement INSIDE the pod
If you do not want to wait for an external IP address to be issued to your pod by Azure, you can also enter the pod yourself and perform cURL statements within the pod:
kubectl run curl-basic-deployment --image=radial/busyboxplus:curl -i --tty --rm
This will fire up a CLI that is running within the pod. Now you can execute a curl statement against the load balancer in the pod:
If you don't see a command prompt, try pressing enter.
[ root@curl-basic-deployment-1042428133-jt8ft:/ ]$


[ root@curl-basic-deployment-1042428133-jr46z:/ ]$ curl 10.244.0.70
Gangnam Style![ root@curl-basic-deployment-1042428133-jr46z:/ ]$
And there is our expected response! So we know the pod itself is working.
8. Summary
Here is a summary of the statements that we have executed in order for us to deploy our load balancing pod:
kubectl create configmap basic-config --from-file=conf.d
kubectl create -f basic-pod.yaml
kubectl create -f basic-deployment.yaml
kubectl expose deployment basic-deployment --port=80 --type=LoadBalancer
kubectl get pods --output=wide
kubectl get services
kubectl get services --watch
Which you can copy & paste as a whole into a Command Prompt window, which then will be fired one by one.
Here are the statements to tear down the pod, so you can re-run the statements above again:
kubectl delete pod basic-pod
kubectl delete service basic-deployment
kubectl delete configmap basic-config
kubectl delete deployment basic-deployment
9. Conclusion
In this lab we saw we can easily create a default Nginx load balancing web server with Kubernetes in AKS. Creating a customized Nginx instance requires a bit more effort. We saw we can use Nginx to create a very rudimentary web server. We can test our deployed containers internally without them being exposed to the outside world.
We hope you enjoyed this lab and thank you for visiting us! Feel free to reach out to me and post feedback below.
Thanks,
Manfred
What if I want to access the external IP through my public IP? I’ve tried with IPTables but can’t seem to get it to work. Any ideas?
In this particular example the external IP address IS the public IP generated by AKS. Are you perhaps running a Kubernetes cluster within one or more VMs? You may need to add the proper interface configuration in /etc/network/interfaces on each of the machines. This may look something like this:
# Host-only networkauto enp0s25
iface enp0s25 inet static
address 192.168.99.10
netmask 255.255.255.0
network 192.168.99.0
broadcast 192.168.99.255
where enp0s25 is your physical network adapter name.
I hope this helps 🙂
Thanks,
Manfred.
can you please provide the contents of basic-deployment.yaml file
Hi Tanjila,
Here you go.
apiVersion: apps/v1beta1 # for versions before 1.9.0 use apps/v1beta2
kind: Deployment
metadata:
name: basic-deployment
spec:
selector:
matchLabels:
app: basic
replicas: 2 # tells deployment to run 2 pods matching the template
template: # create pods using pod definition in this template
metadata:
# unlike pod-nginx.yaml, the name is not included in the meta data as a unique name is
# generated from the deployment name
labels:
app: basic
spec:
containers:
– image: nginx
name: basic
ports:
– containerPort: 80
volumeMounts:
– name: config-volume
mountPath: /etc/nginx/conf.d
volumes:
– name: config-volume
configMap:
name: basic-config
Can you give us the “basic-deployment.yaml” with the correct indentation please?